Quick and dirty: Spinning up a new EC2 web server in five minutes
One of the things I’ve become more adept at in my new life is dealing with the dizzying array of Amazon web services. The two parts of the Amazon kingdom that I’ve really enjoyed using are S3, their RESTful redundant storage solution, and EC2, the on-demand virtual machine system. Recently, I was in a situation where a bunch of us needed a web server quickly and I was able to get an EC2 instance up and running in a few minutes. Okay, to be fair, it took me a little longer than it will take you because I made a couple of mistakes, but now I can easily spin up a new EC2 instance with a basic web server in five minutes.
Create a security group (1st time only)
Go to the AWS console and click on the EC2 tab. On the lower-left is an option called Security Groups, click on that to bring up your current security groups. There is usually a default security group that allows SSH and nothing else.
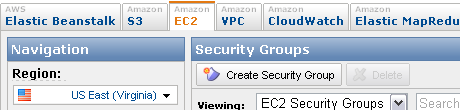
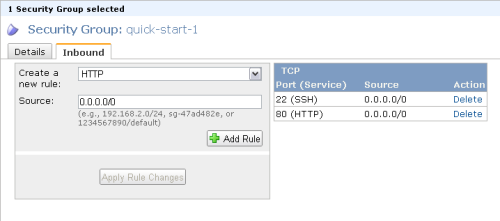
Click the “Create Security Group” button and give the group a name and description. When it shows up in the list, click the name and you’ll see two tabs towards the bottom of the screen. Click on the Inbound tab, which is where you create the security rules. You want to enable SSH and HTTP only at this point (you may choose to add more later).
- Select “HTTP” from the dropdown and then click “Add Rule”. You’ll see the rule added to the right side of the panel.
- Select “SSH” from the dropdown and click “Add Rule”.
- Click the “Apply Rule Changes” button to apply both of these rules.
Now this security group is ready for your new web server.
Create keypairs (1st time only)
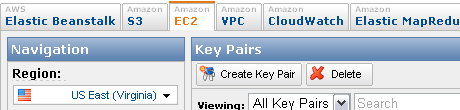
On the same EC2 tab, there’s an option on the lower-left called “Keypairs”. Keypairs are used to secure your EC2 instance so that only you can access them. If you don’t have an existing keypair to use, you can create a new one by clicking the “Create Keypair” button. This will prompt you for a name and then immediately start a file download of a file with .pem as its extension. Keep this file safe because you’ll need it to access your EC2 instance.
Keep in mind that you will never be able to retrieve this .pem file if you lose it. You’ll need to delete the keypair and create a new one.
Create the virtual machine
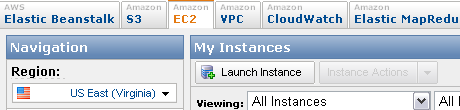
Click the Instances option on the right side of the EC2 tab. Click the Launch Instance button after which you’ll be asked to select which AMI to use. I always just use the first one, Basic Amazon Linux 32-bit AMI, though you may choose another if your needs are different.
If you don’t have any special needs for this box, you can keep all of the defaults on the two Instance Details screens. The one you may want to change is the type of VM (Micro, Small, Large), depending on your memory and computing needs. When it comes to the screen for adding tags, just fill in the name with something that makes sense (i.e. “Test Server”) so you can identify this instance in the AWS console.
The next steps are to to select the keypair and the security group. These should be the ones you already created previously (you can create new ones on the fly, but usually you won’t need to).
The last screen has a button called “Launch”, which will create and start up the VM. Watch the console to see when your VM is ready.
Setting up your virtual machine
Now that the VM is up and running, you can log in using the .pem file saved from creating the keypair. Amazon will automatically assign a domain name to the VM, which you can see by right-clicking on the instance in the AWS console and selecting the “Connect” menu option. This will show you to connect to the VM using a command similar to this:
ssh -i yourfile.pem ec2-user@<span>ec2XX-YYY-ZZZ-X.compute-1.amazonaws.com</span>If all went well, you’ll now be in the command prompt for the VM.The first thing to do is update yum:
sudo yum -y updateBoth Apache and MySQL are already installed on the VM, so you don’t need to do anything for those. If you want PHP and PHP support for MySQL, then run the following:
sudo yum install php
sudo yum install php-mysql
With those installed, it’s now time to start Apache running this command:
sudo service httpd startThe root of your web server is in /var/www/html/, so just drop an index.html file into this directory and you should be able to access the site by typing in the name of your EC2 instance into a browser.
That’s really all there is to it. You can now put additional files into /var/www/html/ and build up your site.
Set services to start automatically (optional)
If you plan on shutting down and starting up the VM on a regular basis, you may want to set Apache and/or MySQL to automatically when the system boots up. To ensure Apache automatically starts, use:
sudo /sbin/chkconfig httpd onIf you also want to start MySQL at boot time, run this:
sudo /sbin/chkconfig mysqld onNow, both Apache and MySQL will start up when you start up the VM.
Wrap up
Creating new instances on Amazon EC2 is incredibly easy and fast when you need a development server in a hurry. The best part is that you pay only for what you use, so running a server for a few hours means paying a very low fee for that usage. I’m now in the habit of spinning up new servers that I may use for a day, or a few days, and then deleting them when I no longer need them. Having this flexibility is an incredibly powerful tool for development, and I hope this post helps you come to this same conclusion.