Setting up SSL on an Amazon Elastic Load Balancer
In my last post, I talked about setting up Apache as an SSL front end to Play, with the goal of having SSL to the end-user while using normal HTTP internally. That approach works well when you have just one server. When you have multiple servers behind a load balancer, the approach is a little bit different.
We’re using Amazon web services for WellFurnished and so are using an elastic load balancer (ELB) to handle traffic. It’s possible to have SSL terminated at the ELB and HTTP the rest of the way, creating a similar set up as with Apache. You basically upload your SSL certificates to the ELB and open up port 443 and you’re in business. In theory, it’s a very simple set up, but I found that in reality there were a few hiccups.
Setting up SSL
The Amazon web services console lets you go right to an ELB (in the EC2 section under “Load Balancers”). When you click on an ELB, you get its properties in the bottom pane. Click on the Listeners tab and you see all the ports that are enabled currently. The last row is reserve so that you can add new ports. If you change the first drop-down to HTTPS, then the entire row changes so you can enter the appropriate information.

In this dialog, the load balancer protocol and port are set to HTTPS and 443, respectively. The instance protocol and port are still set at HTTP and 80, meaning that the ELB will talk HTTP to all of its instances.
Of course, HTTPS is useless without a valid certificate so that web browsers can verify the site.
Uploading certificates to an ELB
When you click on the Select link to specify an SSL certificate you get the following dialog:
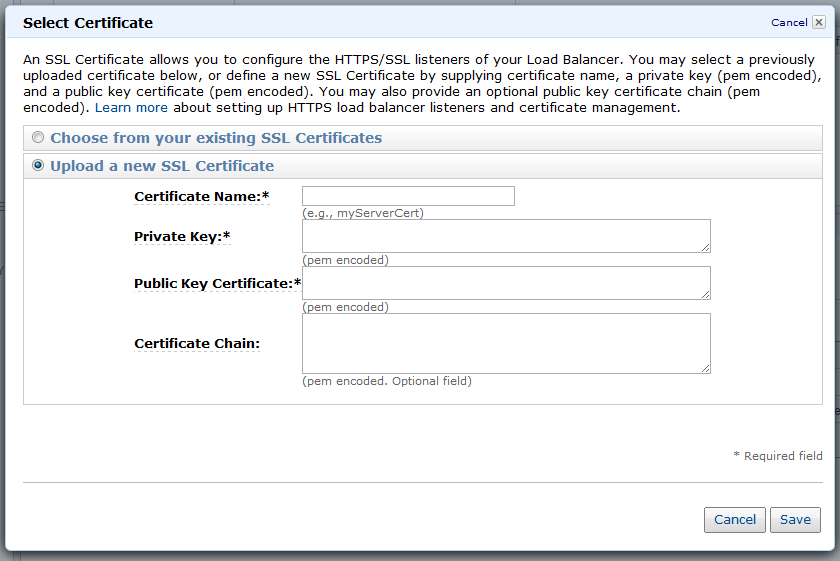
The dialog asks you to enter four pieces of information:
- Certificate Name – The name you want to use to keep track of the certificate within the AWS console.
- Private Key – The key file you generated as part of your request for certificate.
- Public Key Certificate – The public facing certificate provided by your certificate authority.
- Certificate Chain – An optional group of certificates to validate your certificate.
Providing the certificate name is pretty straightforward, it can be anything you want. The name itself is just so you can keep track of it and has no other value.
The other three fields are a little bit trickier. Depending on the source of your SSL certificates, you may have to do a few more steps in order to get things working. We started out by getting a Comodo PositiveSSL certificate. When we received our certificate, we actually received three files in a single zip:
- www_welfurnished_com.crt
- PositiveSSLCA2.crt
- AddTrustExternalCARoot.crt
The actual names of the files may vary depending on the type of SSL certificate you purchase and the certificate authority. The first file is the file that is unique to your domain while the other two are used to form a certificate chain1 for your domain. You will always have a file with the word “root” in it, which is the root certificate2 for your domain while the other is an intermediate certificate.
All Amazon Web services work with PEM files for certificates and you’ll note none of the files we received were in that format. So before using the files, they have to be translated into a format that Amazon will understand.
Private key
The private key is something that you generated along with your certificate request. Hopefully, you kept it safe knowing that you would need it again one day. To get the Amazon supported format for your key, you need to use OpenSSL3 in this way:
openssl rsa -in host.key -textThe result of this command is a lot of text, the final piece of which is what Amazon is looking for. You’ll see something that looks like this:
-----BEGIN RSA PRIVATE KEY-----
(tons of text)
-----END RSA PRIVATE KEY-----
Copy this whole block, including the delimiters to begin and end the private key text, and copy that into the Private Key box in the AWS dialog.
Public certificate
The public certificate is the domain-specific file that you receive, in our case, www_wellfurnished_com.crt. This certificate file must be changed into PEM format for Amazon to use (your certificate might already be in PEM format, in which case you can just open it up in a text editor, copy the text, and paste it into the dialog). Once again, OpenSSL saves the day by transforming the certificate file into PEM format:
openssl x509 -inform PEM -in www_example_com.crtThe output you’ll see look something like this:
-----BEGIN CERTIFICATE-----
(tons of text)
-----END CERTIFICATE-----
Copy this entire text block, including the begin and end delimiters, and paste it into the Public Certificate field in the AWS dialog.
Certificate chain
Don’t be fooled by the AWS dialog, the certificate chain isn’t really optional when your ELB is talking directly to a browser. The certificate chain is the part that verifies that fully verifies which certificate authority issued the certificate and therefore whether or not the browser can trust that the domain certificate is valid. Different browsers handle things in different ways, but if you are missing the certificate chain and Firefox, you get a pretty scary warning page:
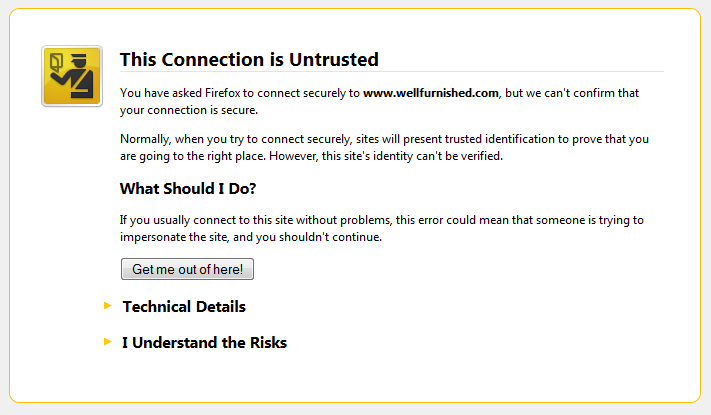
So if your ELB is going to be talking to browsers directly, you definitely need to provide the certificate chain.
The certificate chain is exactly what it sounds like: a series of certificates. For the AWS dialog, you need to include the intermediate certificate and the root certificate one after the other without any blank lines. Both certificates need to be in PEM format, so you need to go through the same steps as with the domain certificate.
(openssl x509 -inform PEM -in PositiveSSLCA2.crt; openssl x509 -inform PEM -in AddTrustExternalCARoot.crt)The output of this command is the concatenation of the two certificates in PEM format. Copy the entire output into the Certificate Chain box in the dialog.
Note on errors
The AWS dialog will give you an error message if any of the fields contains an invalid value. This is very helpful, as it prevents you from needing to debug errors down the line if you misconfigured the certificate information. On the other hand, the error message is usually completely unhelpful along the lines of, “Invalid private key”. It will never give you more specific information about why your information is wrong, though the most common reason is that the format is incorrect. The most common errors are not using PEM format, not including all of the delimiters, and having additional blank lines.
Use with Play
When setting this up in production, I noticed an interesting wrinkle with our Play server. I had it set up with XForwardedSupport=127.0.0.1 to enable the use of X-Forwarded-* headers with Apache4 in our integration environment. When I put this into production, I started getting all kinds of errors. The problem is that the X-Forwarded-For header is set by the ELB to be the ELB IP address rather than the Apache IP address (Apache is still used on the front end servers to front Play). The result was that Play was not allowing requests through.
I disabled XForwardedSupport in production only, figuring I would go back and solve that problem later. As it turned out, I actually didn’t need to do anything else. My first test and production works correctly and request.secure was already returning the correct value. Upon looking at the source code, it appears that XForwardedSupport only affects the values of request.host and request.remoteAddress.
Conclusion
The process of setting up SSL on an Amazon elastic load balancer isn’t as straightforward as it seems from the simple dialog. I spent several hours scouring the Internet for tips on how to deal with certificates on an ELB. I hope that this post saves you some time when setting up SSL on an ELB.