Computer science in JavaScript: Linked list
When I started writing the first edition of Professional JavaScript, my working title was JavaScript for Web Applications and it featured a lot of content that didn’t make the final cut. I actually have several chapters worth of content just sitting around on my computer. Several of these chapters discuss implementing common computer science patterns and algorithms in JavaScript. At the time, I thought this would make a good addition to the book, but ultimately ended up holding them back as they didn’t fit the final vision for the book. Instead of letting that content sit on my computer, I’ve decided to start sharing on this blog.
One of the first data structures you learn in computer science is the linked list. As a quick refresher, here’s the Wikipedia description of a linked list:
It consists of a sequence of nodes, each containing arbitrary data fields and one or two references (“links”) pointing to the next and/or previous nodes. The principal benefit of a linked list over a conventional array is that the order of the linked items may be different from the order that the data items are stored in memory or on disk, allowing the list of items to be traversed in a different order. A linked list is a self-referential datatype because it contains a pointer or link to another datum of the same type. Linked lists permit insertion and removal of nodes at any point in the list in constant time, but do not allow random access.
Linked lists are often used in computer science programs to help introduce the concept of pointers. The list itself is just a pointer to the head node, which in turn points to the next node, and so on. Each node consists of two fields: a data field containing the value for that location in the list and a next field containing a pointer to the next node in the list (or an empty pointer if it’s the last item).
To begin a JavaScript implementation, start with creating a single node. This can be done most easily by using an object literal:
var firstNode = {
    data: 12,
    next: null
};
When you want to create a list, create a new node and assign it to this node’s next property:
//attach to first node to create list
firstNode.next = {
    data: 99,
    next: null
};
Once you have a list, you can traverse by following the next property on each node to get to a specific point in the list. Of course, doing all of this by hand is annoying and error prone, so it’s better to create a custom type. Here’s the start:
function LinkedList() {
    this._length = 0;
    this._head = null;
}
The LinkedList constructor creates an object with “private” properties: _length, which contains the number of items in the list, and _head, which points to the first item in the list. Initially, _head is set to null because the list is empty.
Adding an item into a linked list requires walking the structure to find the correct location, creating a new node, and inserting it in place. The one special case is when the list is empty, in which case you simply create a new node and assign it to _head:
LinkedList.prototype = {

    add: function (data){

        //create a new node, place data in
        var node = {
                data: data,
                next: null
            },

            //used to traverse the structure
            current;

        //special case: no items in the list yet
        if (this._head === null){
            this._head = node;
        } else {
            current = this._head;

            while(current.next){
                current = current.next;
            }

            current.next = node;
        }

        //don't forget to update the count
        this._length++;

    },

    //more methods here
};
The most complicated part of this method is traversing an already-existing list to find the correct spot to insert the new node. Traditional algorithms use two pointers, a current that points to the item being inspected and a previous that points to the node before current. When current is null, that means previous is pointing to the last item in the list. I’ve recreated this algorithm in JavaScript though there are several other (arguably better) alternatives for tradition’s sake.
Retrieving a value from the list involves the same type of traversal:
LinkedList.prototype = {
    //more methods

    item: function(index){

        //check for out-of-bounds values
        if (index > -1 && index < this._length){
            var current = this._head,
                i = 0;

            while(i++ < index){
                current = current.next;
            }

            return current.data;
        } else {
            return null;
        }
    },

    //more methods here
};
The item() method checks to ensure that the index being specified is within a valid range before traversing the list. The while loop is used to figure out the correct place to stop in the list to find the data being requested.
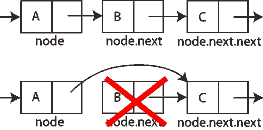
Removing a node from a linked list is a little bit tricky. You need to find the node to remove then set the previous node’s next property to appropriate next node. This “skipping over” of the appropriate node results in it’s removal from the list.
The typical implementation of linked list node removal is to have two pointers, a current pointer that indicates the node being inspected and a previous pointer that points to the node just prior to current. When current is the node to remove, then previous.next must be set to current.next to execute the removal. The code:
LinkedList.prototype = {
    //more methods

    remove: function(index){

        //check for out-of-bounds values
        if (index > -1 && index < this._length){

            var current = this._head,
                previous,
                i = 0;

            //special case: removing first item
            if (index === 0){
                this._head = current.next;
            } else {

                //find the right location
                while(i++ < index){
                    previous = current;
                    current = current.next;
                }

                //skip over the item to remove
                previous.next = current.next;
            }

            //decrement the length
            this._length--;

            //return the value
            return current.data;

        } else {
            return null;
        }

    },

    //more methods here
};
Note the one special case is in the removal of the first item. In that case, you need to set _head equal to _head.next, moving the pointer for the start of the list to next item.
Once complete, you can use the linked list implementation like this:
var list = new LinkedList();
list.add("red");
list.add("orange");
list.add("yellow");

alert(list.item(1));   //"orange"

list.remove(1);

alert(list.item(1));   //"yellow"
This basic implementation of a linked list can be rounded out with a size() method to return the length of the list and a toArray() method to convert into a regular array. The full source code is available on GitHub at my Computer Science in JavaScript project. I’ll be updating the project with each blog post and hopefully build up a nice collection of implementations for reference. Just to be clear, I’m not advocating using this in production code; the native Array object serves all of our needs quite well. This is purely an academic exercise and should be treated as such.


